Converting A Pantera To Ford Taurus Power Window Motors
By Bill Taylor
This is a nonreversible conversion and the emergency cranking of the window will no longer be possible.
Why would I do this? The OEM Pantera window drive gears are fragile and noisy and the window drive motor is bulky and inefficient relative to modern DC motors.
What will I Gain? The Taurus power window motor and gearbox are integrated, the combined motor/gearbox are much smaller and lighter than the OEM parts. The existing Taurus motor drive gear matches the OEM Pantera window lift sector. The window will move twice as fast using one-half the current. Replacement Taurus window motors are cheap and readily available.
Why not use the Taurus motor and the Pantera gearbox? I already have those nice brass gears. The Taurus motor can not be separated from the Taurus gear box and used to drive the OEM Pantera gearbox because the Taurus gearbox also serves as the bearing and the end cap for the front of the Taurus motor.
Where do I get Taurus motors? Ford Taurus power window motors are available (rebuilt or new) from auto parts stores (~$50), on the internet (~???), and in every salvage yard.
I used motors from a 1990 Taurus. The Taurus driver side window motor (Ford PN E6DF-14A365-AB) labeled "LF" is used on the Pantera passenger side. The Taurus passenger side window motor (Ford PN E6DF-14A366-AB) labeled "RF" are used on the Pantera driver side. I got my motors from a local Ecology "pick-a-part" for $15 each. The driver side/passenger side and passenger side/driver side switch is required due to the differences between the OEM motor mounting in the Ford and the Pantera. Access to Taurus window motors are obstructed by a bracket mounted with rivets, so take a hammer and a chisel (or a battery powered grinder) along with the normal hand tools. Why a 1990 Taurus? The interior door trim panels had already been removed from that car. The "pick-a-part" had dozens of Ford Taurus and Mercury Sable cars to choose from. I don’t think the year will matter as long as the motor/gearbox looks like the one in the attached pictures.
To replace the exiting Pantera window motors, remove the door handle, the armrest, and the door interior trim panel. Carefully remove the plastic cover under the interior trim panel. Position the window vertically such that the window lift arm attachment screw is accessible. Secure the window to the window frame with tape or clamps so the window can’t fall when the left mechanism is removed. A view of the passenger side door at this stage is shown in Fig. 1.
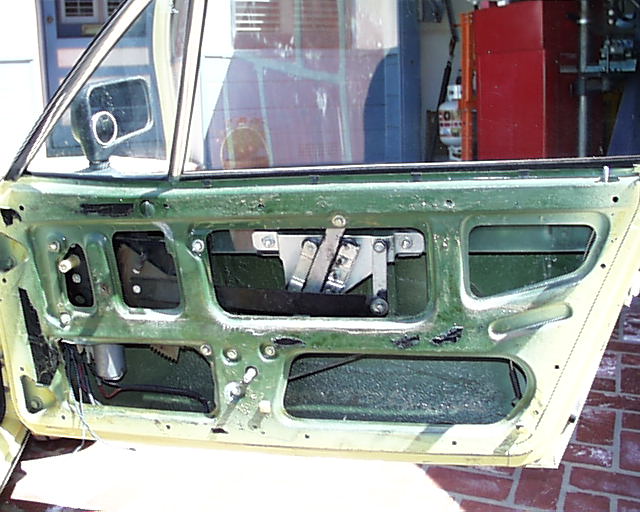
Fig. 1
To remove the window lift mechanism, remove the three bolts which hold the door handle assembly to the door frame. Reach inside the door and find the small plastic clip which guides the door release rod. Carefully pull this clip out of the mounting hole in the door frame. Move the door handle mechanism up and place it thru the door opening. Remove the single screw which attaches the lift mechanism arm to the window lift bracket. Disconnect the two wires at the OEM window motor. Remove three of the four bolts which attach the lift mechanism to the door frame. Insert a screw driver in one of the bolt holes to support the lift mechanism. Remove the fourth bolt. Remove the lift mechanism thru the lower aft opening in the door frame. A view of the driver side door at this stage is shown in Fig 2.
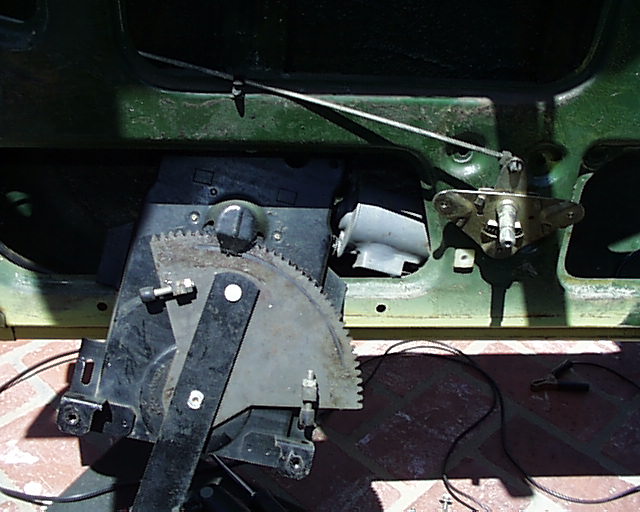
Fig. 2
Clean the grease off the lift mechanism sector gear on the back side of the lift mechanism.
The OEM lift mechanism is shown in Fig 3. Clamp the window lift arm to the frame of the lift mechanism so that the lift arm (which is spring loaded) cannot move when the OEM gearbox is removed. Remove the OEM motor, gearbox and emergency crank mechanism. Find the three OEM gearbox mounting posts shown in Fig. 4 and grind them off flush with the lift mechanism frame. Using a saw, cut a motor clearance opening in the lift mechanism frame as shown in Fig. 5. This grinding and cutting is required to properly position the Taurus drive gear with the OEM lift mechanism sector gear and position the Taurus motor in the same general area as the OEM motor.
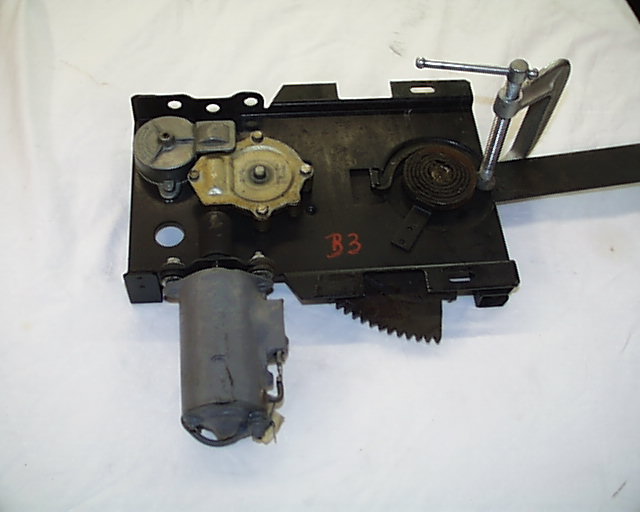
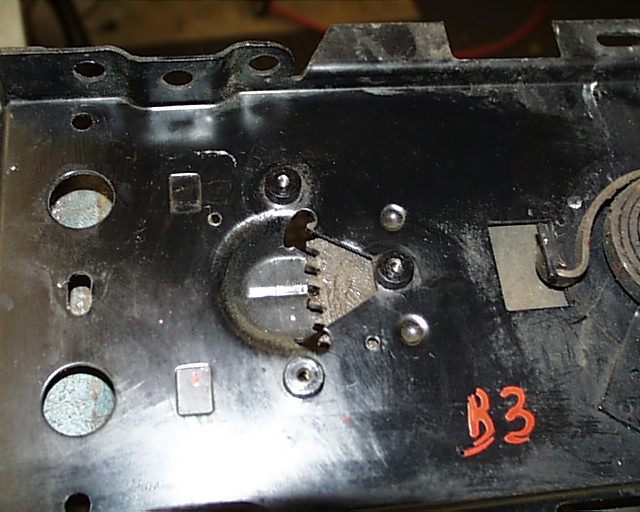
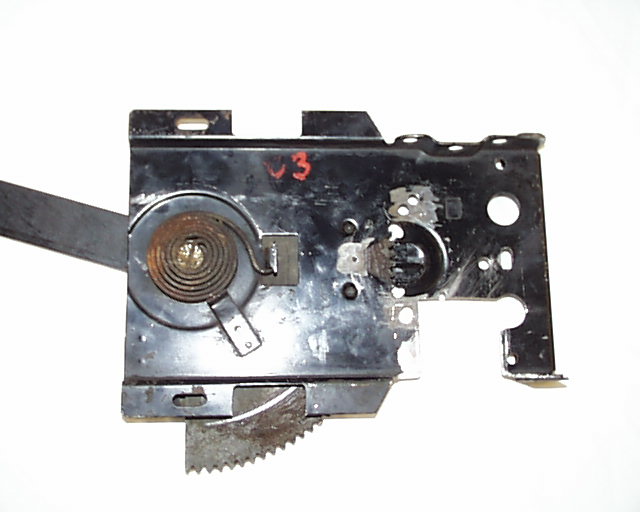
Fig. 3 Fig.4 Fig. 5
Now is the time to paint all bare metal parts.
On the Pantera driver side lift mechanism, place the Taurus passenger side window lift motor (Taurus Ford PN E6DF-14A366-AB labeled "RF") as shown in Fig. 6. Check to be sure that the Taurus drive gear is fully engaged, but not binding, with the Pantera lift mechanism sector gear. Check that the cut out made in the lift mechanism frame clears all parts of the Taurus motor. Carefully mark the three Taurus motor mounting holes, drill the holes and bolt the Taurus motor to the lift mechanism frame. Verify that the Taurus motor drive gear is fully engaged, but not binding, with the Pantera lift mechanism sector gear. Carefully release the clamp holding in the window lift arm to the lift mechanism frame.
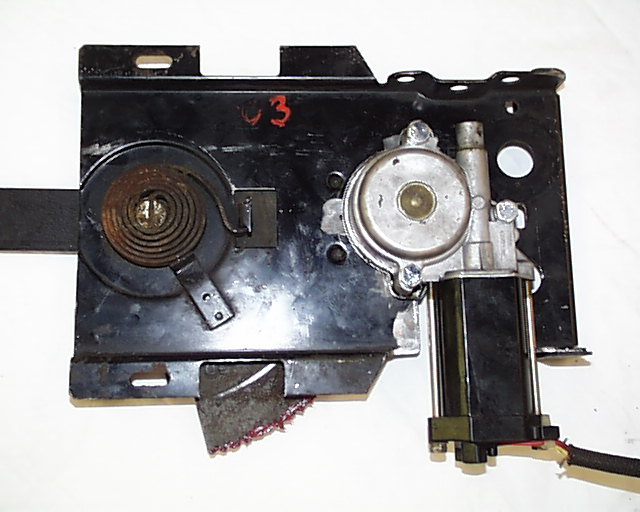
Fig 6
Mount the lift mechanism frame in a vise or clamp the frame securely to a workbench such that the lift mechanism can travel freely through the full range. The window lift mechanism can now be tested by connecting the wires from the Taurus motor to a 12Volt source. The polarity of the power connection to the wires is not important. Keep your vital parts clear of the lift mechanism and the window lift arm. The window lift arm will move quickly and the motor has very significant torque. Normal current to the Taurus motor is around 4 amps to start and 2 amps to run.
Position the lift mechanism to the full up position and put some lubricant between the sections of the window lift helper spring shown in Fig 7. This spring, if dirty or rusted, can bind and make strange snapping noises when the window moves. Do not remove this spring for cleaning. Reinstalling this spring is a very hazardous job. Clean and lubricate the spring in situ.
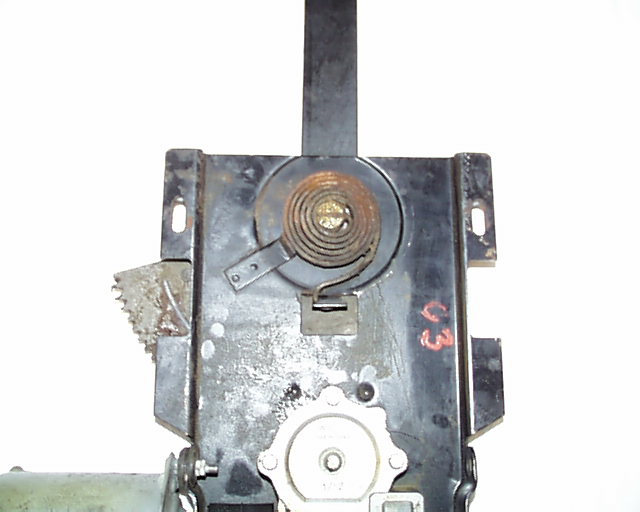
Fig. 7
Now is the time to make the window move freely in its travels. Provided that the door/window frame have are not "tweaked" the window should easily move over the full range. I slotted the mounting holes for one side of the window lift bracket rollers. I slotted the bolt hole at the bottom rear of the door where the rear most window channel attaches. I slotted the bolt hole in the bottom of the door frame for the mounting of the rail on which run the lift bracket rollers. I slotted the bolt hole in the top of the door frame (washers are used as spacers at this location) for the mounting of the top of the rail on which run the lift bracket rollers.
If all the pertinent bolts are set only finger tight, and the window is moved by hand over the full range, you will be able to see where the ends of the rails, channels, and rollers "want to be" as the window moves. By iteratively moving and adjusting, you will be able to find a compromise for all these adjustments. My window moves easily in both directions using one hand but will not drop if unrestrained. When this situation is obtained, the lift mechanism will have no problem moving the window quickly and quietly.
Installation of the window lift mechanism truly is the reverse of the removal. When remounting the door release rod plastic guide clip, be very careful not to break the clip and to seat it properly in the mounting hole. If the clip is broken or not properly mounted, the door release rod will rattle whenever the door is closed or the car hits a bump.
Install spade lugs on the two Taurus motor wires so as to mate with the lugs on the two wires coming from the window control switch. Plug the Taurus motor wires into the window switch wires. The polarity of the initial wire connection is not important. Exercise the window using the window control switch. If the window moves in the wrong direction with respect to the switch command, interchange the two Taurus motor wires.