BUMP-STEERING: WHAT IS IT, SHOULD I CARE, AND WHAT CAN I DO ABOUT IT ANYWAY?
By Jack DeRyke
|
All of the technical information and product information posted on this website is offered as general information and is not recommended, endorsed, guaranteed or presented as professional technical information. It is recommended that you seek professional help for the repair or maintenance of your car. Improper self-maintenance or repair of your car can result in serious injury and or death. Use of this information is done at your own risk. |
(Originally published in the April 1998 POCA News Letter)
Bump steer is the tendency for the tire hitting a bump to momentarily change its toe-in setting, which causes the car to feel like someone turned the steering wheel a bit. This happens due to the tires’ suspension going up and down over the bump. The steering arm is attached to the body of the car at one end, and the suspension at the other end. So it travels in an arc. When a rod with one anchored end travels in an arc, the effective length of the rod changes. This is what pulls on the wheel and makes it feel as though someone besides the driver is steering the thing.
Before one begins to mess with suspension tweeks, first set your ride height Ride height is measured from a "hard point" on the Pantera chassis to the ground, and unless your car has survived an accident, should be identical on the left and right sides with an 85-lb weight in the drivers seat and a 65 lb wt in the left floor area ahead of the pedals (or get an 165-lb friend to sit in the seat while this stuff is going on). A good hard-point for the front is the front stub-frame, just behind the front wheel well. A rear hard point can be the rear stub frame just ahead of the gas tank. Clean off the undercoating & chalk-mark them for reference.
Note- If your car has the OEM spring spacers (aluminum discs under the springs to adjust headlight and bumper height to U.S. Gov’t specs), remove them. Also note that the high-speed behavior of the Pantera is vastly more controllable if there is a downward ‘rake’ or nose-low appearance of the car’s attitude- that is, if the front height measurement is 1"- 2" lower than the rear measurement
If you have adjustable ride-height shock absorbers, this job is vastly simplified. Jack up the car, unlock the jam-nut on the threaded collar of your spring perch and turn the adjusting collar (up to raise, down to lower). The geometry is such that a movement of 0.250" on the shock will yield a body height change of about half that, or 0.125". For the majority of Panteras, adjustments to ride height are tedious. Shims must be added to the spring-shock assembly to level out the sides of the car, and also to trim the front rear attitude. You can begin with the stock shims but remember, none of the adjusting shims you need will necessarily be the same thickness, so it’s advantageous to do this in close proximity to a lathe. After setting the slight nose-down attitude of your car and shimming and setting the side-to-side balance, you must re-align the wheels since everything you’ve done to this point has affected it. Any subsequent changes to caster will alter bump steer!
OK, finally, we can begin to play with bump-steer. Bump steer measurements are done by removing both the springs and shocks in front and setting the car body at the before-adjusted ride height with a jack. A plate or piece of plywood is positioned vertically, near but not touching the front wheel. The plywood should have holes in it that correspond to the front and rear of the rim, about half-way up from the ground.
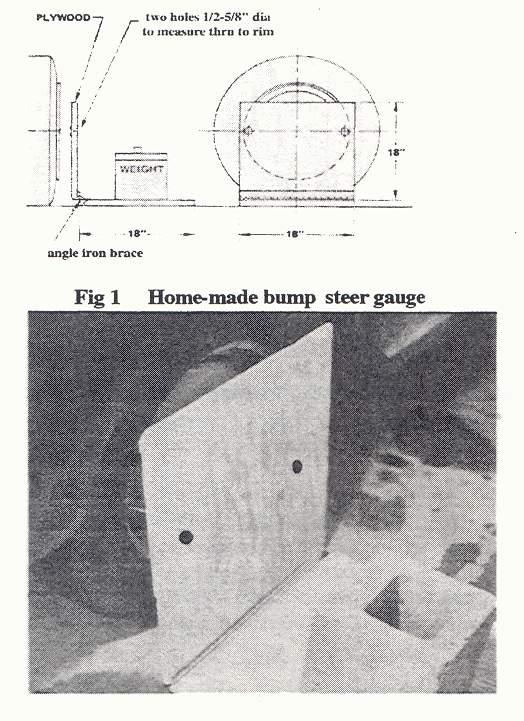
Bump Steer Gauge
Measure the distance from the tire rim to the outside of the vertical plate. A caliper gauge works fine. Write this down as "zero ht fit and zero lit rear". Now lower the car 1/2" and re-measure, writing the measurements down as ‘bump .500" frt and .535" rear". Continue this exercise until you have a set of measurements for car body movement down 2-1/2" and up 2-1/2" from the static ride height starting point.
Surprise! You only need do this on one front wheel! We will assume that both wheels react the same, so you’re done and can reassemble the Pantera’s front suspension. If you subtract the rear readings from the respective front readings, you get the change in toe-in that occurs when your very own Pantera hits a bump. And if you graph the differences, you’ll get a curve like one of the following ones:
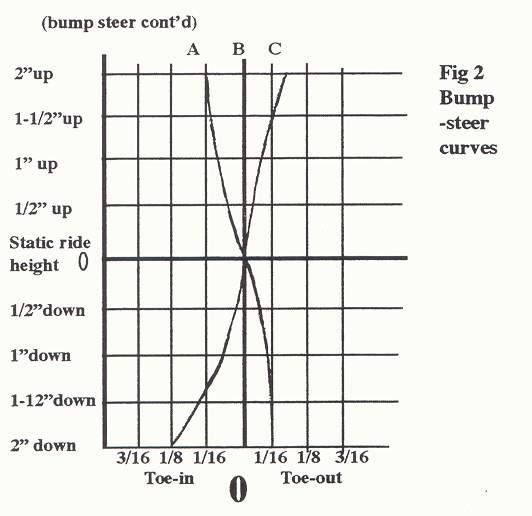
Bump Steer Curves
But many other curves are possible, most of them bad for handling. OK, now you know just how bad the bump-steering is in your particular Pantera. The correction can be done many ways, most of them involving heat and bending or remachining the steering arms. I prefer to lower the steering rack so as to change the arc of the steering rods that produce the bump-steering. It is done with no special power tools, is non-permanent and is virtually undetectable for those who value "originality".
The Pantera’s steering rack is held to the chassis with two massive steel split-damps. The clamps are held to the chassis by two M8- l.25x 70mm bolts on each side. By adding a spacer for each side between the rack and chassis, the rack will be moved downward.
![]()
Rack Spacer
Since each car needs slightly different spacer thicknesses to correct it’s geometry, you will need to make up a few pairs of spacers of different thicknesses. Start with two spacers of about 1/4" thickness and slip them under each of the rack mounts. Note- somewhat longer bolts (#36 in rack drawing) will be necessary when we finally achieve a very low bump steer setting. Do not reattach the reinforcement bracket (#37 in rack drawing) yet - we’ve got a ways to go first!
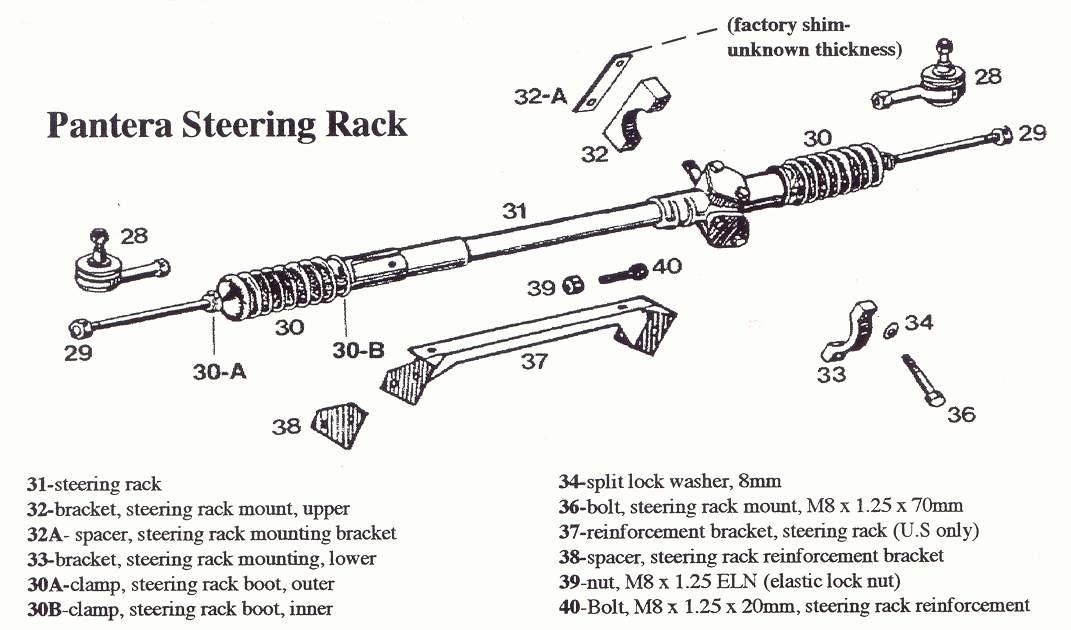
Pantera Steering Rack
Now, re-do the raising & lowering of the car, and record the toe change for the front wheel you originally checked. Subtract the difference as before and graph the results; does the curve now appear more nearly a straight line than before (more like Curve A?) OK, we are moving in the right direction! A second pair of shims of 1/8" thickness can be slipped under the rack together with the first set. Re-run the measurements a third time, and decide if the curve is becoming more nearly straight, or does it now veer off again? If so, the 1/8" second shims were too thick and a thinner pair should be tried. Be sure to shim both sides of the rack evenly or the rack casting will bind and could eventually crack.
Generally, toe-out down means that the rack is lower than is optimum; raise it back up a bit. Conversely, toe-in down means that the rack still needs to be lowered; add another shim. The amount of change and the direction of the resultant are inexact; cut-and-try is really the only way
Bump steer can never truly be eliminated; one can only minimize it in a given suspension geometry. So at some point in the above exercise, you will concede that your car’s geometry has been improved to your satisfaction. This has been a long, tedious session but of no great expense. Be aware that of your contemporaries, not one in a hundred has actually gone through this job to explore his individual suspension geometry; this marks you as a true do-it-yourselfer, since the minimizing of bump-steer at any pro race shop will be done in exactly the same way, probably with a little more speed and a little less effort, but using essentially the same methods, costing perhaps $500! Congratulations!
In the following sketch, a stylized front suspension very similar to the Panteras’ is seen. Note that the upper and lower A-arms are of different length, and that the steering track rod is a third length. Also note that none of the parts- A-arms nor the track rod are parallel to the ground.
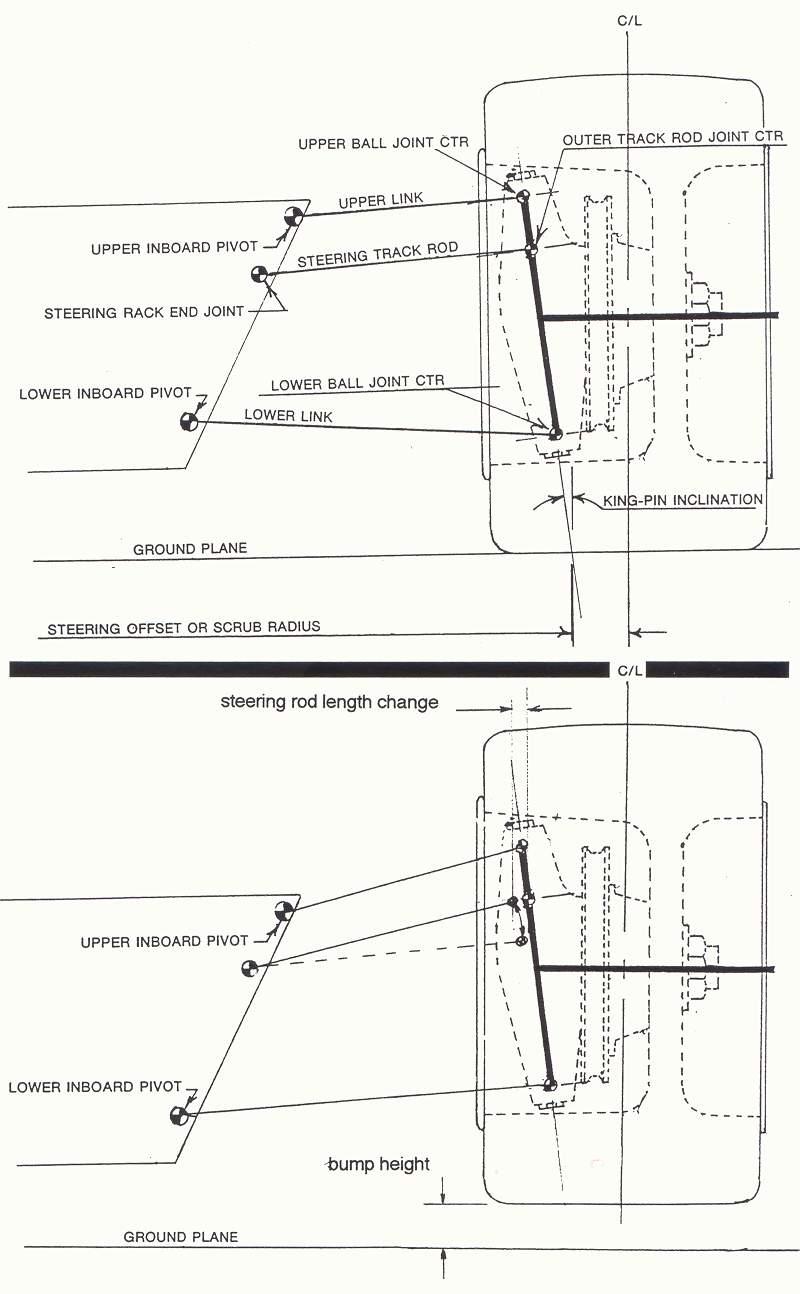
Front Suspension Drawing
What this means is, upon hitting a bump, the wheel assembly with the outer parts of the A-arms and the end of the track rod move in arcs of different lengths. That’s OK for the A-arms since they are fastened to the chassis of the car in two places and thus simply move up and down.
But the track rod is a single point mount and is attached only to the steering box and the steering arm for that wheel assembly. So when the wheel assembly moves up and down, taking the end of the track rod with it, the effective length of the rod changes according to Pythagoris’ Theorem of right triangles (See-your old High School geometry teacher was right! There IS a real-world use for Plane Geometry!)
This change in the track rod’s effective length pulls on the steering arm as the wheel assembly moves up (and down), changing the steering angle of that wheel slightly. The driver will detect this as a "twitch" in one direction or the other, and his description of the handling will be, "The car self-steers over bumps a bit".
Bump steer is a complex function of the relative lengths of the A-arms to the steering rod, the angles they all go through when deflected, and the caster/camber angles the chassis designer built into the car. Bump steer cannot be totally eliminated, but by changing the angle of the track rod relative to the A-arms, the tendency to move the wheel assembly can be minimized.
Note that the effect on the track rod angle will be the same, whether the inboard end (the steering rack) or the outboard end (the tie-rod ball joint) is raised or lowered. Some cars are more easily corrected one way an the other, but the result is the same on the rod angle.
Note: Back issues of the POCA newsletters are available from the POCA Store. Go to www.panteraclub.com
Ed. A big thanks go to Jack DeRyke for sharing this outstanding article with the visitors to the Pantera Place.